
TeamViewer is a reliable remote accessing software that enables remote connection to your Windows computer or device from any location globally location. To installing TeamViewer, simply visit the official website, download the TeamViewer installer, and follow the provided instructions that are mentioned below. The installation process is in very easy steps, granting you the ability to effortlessly access to your computer remotely or provide assistance to other user’s those are available on remote location.
What is TeamViewer?
TeamViewer is a free software application available that enables remote access to computer or allows you to connect and control to another desktop remotely. It offer features like file transfer, screen sharing, and more. making it an essential tool for seamless remote collaboration and support.
How to Install TeamViewer on Windows
Installing TeamViewer on Windows is straightforward and works with all Windows versions. However, it’s important to download the installation file and TeamViewer installer that matches your system version for compatibility and optimal performance.
Step 1: Download TeamViewer
Begin by visiting the official TeamViewer website at TeamViewer to download the software installer. Alternatively, you can use direct download link provided on site to access the installation file quickly and fast.
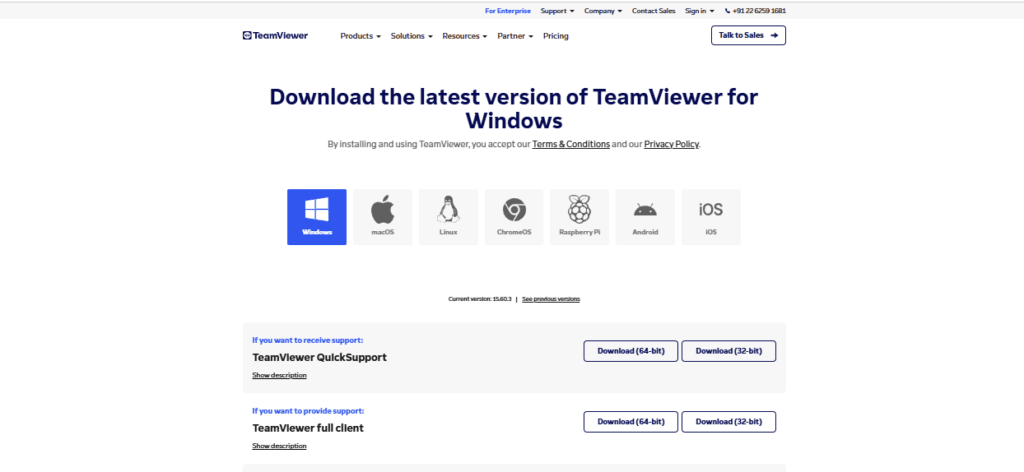
Step 2: Choose and Download for Your Operating System
Select the version of TeamViewer that matches your operating system(OS), such as Windows, macOS, or Linux. For Windows users, choose Windows as operating system and download the TeamViewer Full Client, which is the most recommended option for a complete experience and for full control of remote user’s.
Step 3: Start the Download
Click on Download button to begin downloading TeamViewer installer file. Follow the prompts on website to ensure that the file is saved to your computer.

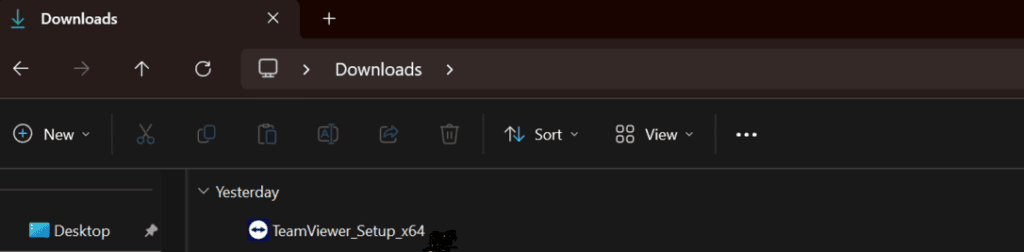
Step 4: Locate and Open Installation File
After the download is complete, the installation file will be saved in your system Downloads folder C drive by default. Navigate to this folder, find the downloaded file, and double-click it to start the installation process.
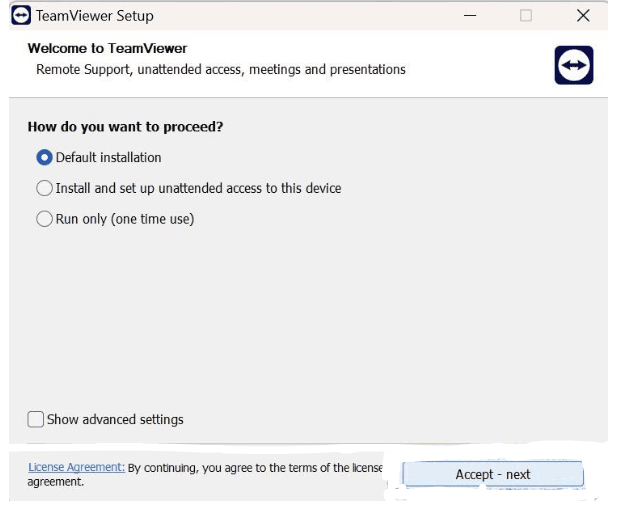
Step 5: Select the Installation Type
A dialog box will appear on your laptop screen, prompting you to choose the preferred installation type that is three types. To proceed with the default installation mode, simply click on the Accept – Next button to install on your laptop ..
Step 6: Files are Extracted
During installation process, TeamViewer will automatically extract necessary files to setting up the software on your system to use.
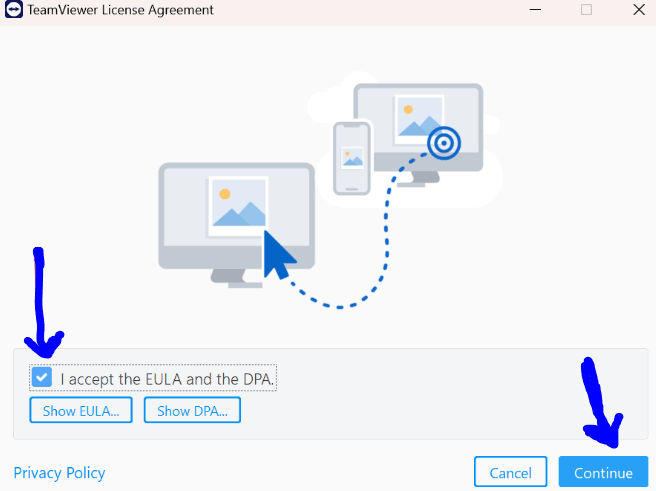
Step 7: Accept the Terms and Conditions
Tick the checkbox “I accept the EULA and the DPA” to agree to the Terms & Conditions. Then, click to Continue to proceed with the further installation.
Step 8: Installation Complete
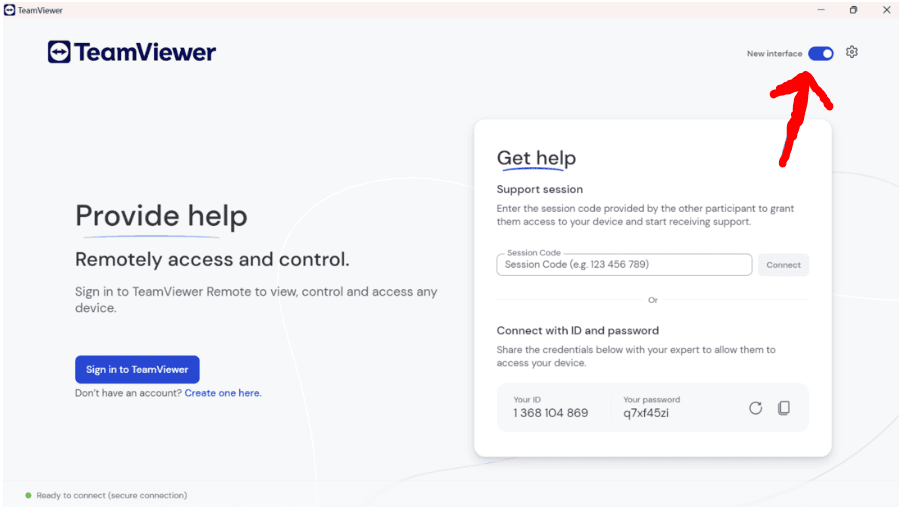
Once the installation is completed, you’ll see a screen that is displaying the new TeamViewer interface. If you prefer to switch back to standard interface, simply turn off the “New Interface” toggle switch located at the top-right corner of the screen of TeamViewer window.
Step 9: Restart to Apply Changes
If you toggle switched off or on, a restart will be required for the application. Click on Restart to apply changes and complete the setup process of TeamViewer .
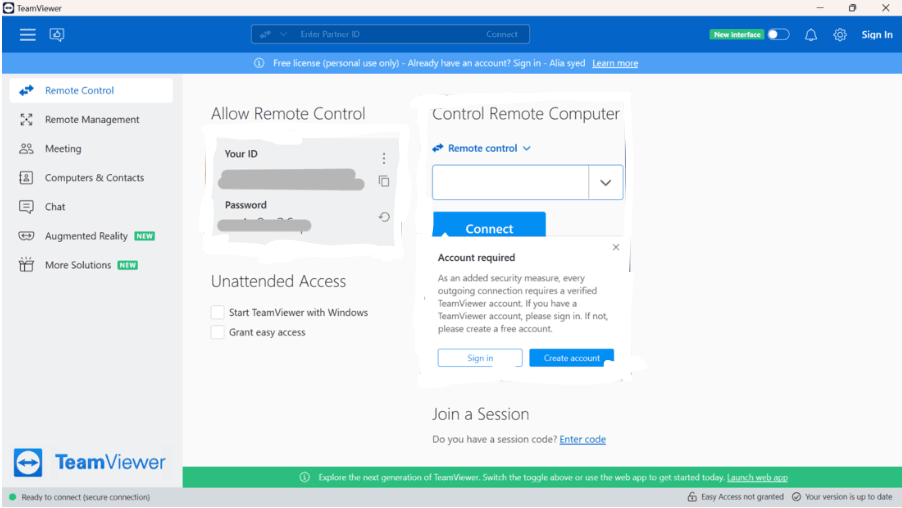
Step 10: Set Up Remote Control Options
In the “Allow Remote Control” section, you can give permission for remote operator to control your computer devices. The “Control Remote Computer” section allows you to control another device that available on remotely. After the installation is complete, make sure to sign in and create an account to fully utilize the software.
remote control, allow remote control, control remote computer, TeamViewer installation, create an account, sign in, remote access.
Conclusion
Installing TeamViewer on Windows is a straightforward process that provide a wide range of remote access features. Whether you are transferring file, hosting remote meeting, or providing assistance to others, TeamViewer is reliable choice. By following the simple steps mentioned in this installation guide, you can quickly set up TeamViewer on your Windows system and start using its powerful capabilities of TeamViewer application. Once the application is installed, establishing remote connections is just few click away.
FAQs for installing TeamViewer
1. What is TeamViewer and How Does It Work?
2. How Can I Download and Install TeamViewer on Windows?
1. Visit official TeamViewer website.
2. And Download Windows version of TeamViewer.
3. And then Open the downloaded file and follow the on-screen instructions.
4. Then Accept the terms and conditions and complete the installation.
5. Once installed, start TeamViewer and start using it for remote access.
3. Is TeamViewer application Safe to Use?
4. Can I Use TeamViewer for Free?
5. How Can I Control Another Computer Using TeamViewer?
1. Make sure TeamViewer is installed on both computer and devices.
2. Ask remote user to share their TeamViewer ID and the password.
3. Enter their ID in your TeamViewer application and click on “Connect.”
4. Type in provided password and gain access to their screen and device.
5. Now you can control their computer as if you were sitting in front the remote computer
Thanks for reading this! I am also planning to post articles related to Python issues. I have noticed that many users and Python beginners face challenges with debugging. I have posted an article on optimizing Python code—please check it out and see if it is useful to you.